The Problem
I think we don't need to discuss that backups are a very convenient mechanism to restore accidentally deleted files or to recover your business from a malware / hacking attack.
A lot of companies (and also unaware sysadmins) are doing their backups with some kind of "Use some local rsync / robocopy script to copy all data to another drive / location" strategy.
- Is this bad ? -> No! ... you have a backup if you need one.
- Is it good ? -> Well ... it depends of how you do your backup in detail.
Imagine the following situation: You have a PC which is backed up by the previous mentioned strategy. All your backups are running regularly and then suddenly a ransomware comes along which tries to encrypt all your data. You might end up with an fully encrypted machine and also an encrypted backup - which renders it completely useless.
Why can this happen ?
Poorly configured backups are leaving you with a dilemma: Your backup location must be writable, because otherwise the backup can not be performed. But if it is writable then it is (inmost cases) also deletable or encryptable for a process (the malware) which runs on your PC.
On the other hand: If you can not write to your backup location, then you can not backup anything at all !
Especially malwares / ransomwares are capable of looking into all mounted devices. So it it is writable, then there is a high chance of being affected by ransomware.
How to overcome this issue ?
The most simple approach is to
tweak the permissionsof your backup storage: Make sure that it is possible to write, but not to overwrite a backed up file. This approach implements some kind of versioning mechanism for your files: If one file is corrupted then there is a high chance that you will find the non corrupted version of this file in a previous copy.
This can be reached by simply exchanging the backup disks from time to time, or by implementing some kind of time-machine-styled backup.
However: If the ransomware can somehow reset the permissions or compromise the backup process (i.e. by privilege escalation), then your backups (and also your backup server) may be worthless, because your backups CAN be reached from your PC.
The better way is to apply the Hollywood principle: "Don't call us - we call you !"
In other words: Let the backup server decide when and what to backup. Implement a process where the backup server logs into your machine, performs the backup and transfers it back to the backup storage. This provides some real advantages:
- The PC does not even have to know the credentials of the backup location.
- If your PC is infected, then it CAN NOT spread to your backup server.
- Since the backup server pulls the data, you only need read permissions on your PC.
The Solution
The here provided solution is a manifestation of the later strategy, where the /home directory of my linux box is backed up proactively pulled by my Synology NAS and stored thereon.
The used tools are Linux standard tools: rsync and ssh
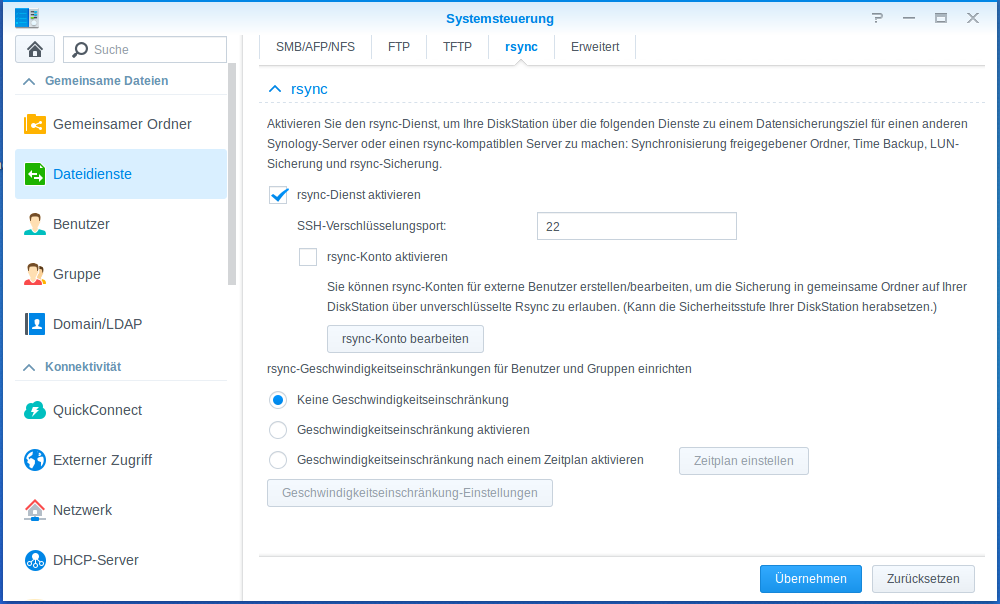
Step 1@Sonology: Enable rsync and create a backup location
- You need to enable rsync on your synology.
- Create shared backup folder (e.g: backup_mypc). If your run the backup as root user then there is no need to give anybody some special permissions.
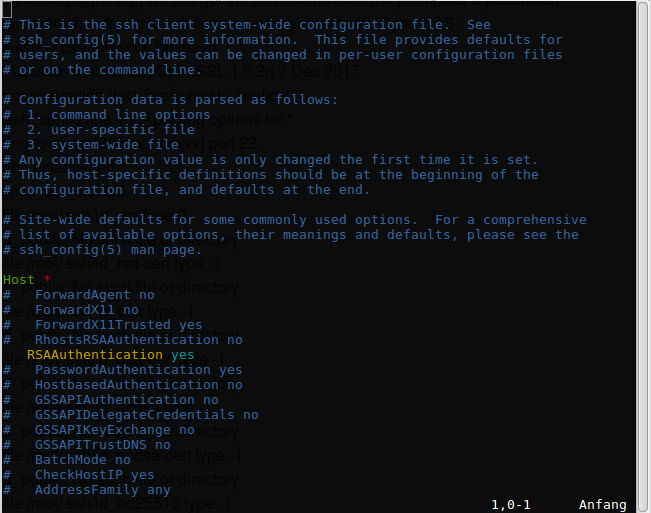
Step 2@PC: Enable RSAAuthentication for SSH
Since I do not want to enter my PCs credentials for each and every backup, I need to enable my NAS to login into my PC (in order to read the backup files). This can be done via SSH and a feature called RsaAuthentication, which has to be enabled on my PC in the file /etc/ssh/ssh_config by uncommenting the RSAAuthentication yes line and reloading the settings with sudo service ssh redload
This feature works like this: If someone tries to login via SSH + RSAAuthentication then the SSH daemon looks into the file ~/.ssh/authorized_keys if there is a matching public key for the request. If such a key can be found, then the client is authenticated and no password is requested.
In other words: If you put a public SSH key into the authorized_keys file, then the computer/user with the corresponding private key can log into the machine ! .. So let's do this.
Step 3@Synology: Create a Public/Private keypair
In order to do this, you need to login into your sonology via ssh. Usually you do this with your admin account and then elevate up to the root user (sudo -i)
Password: <your_admin_password>
root@server:/$ cd /root
root@server:~# ssh-keygen -t rsa -b 2048 -f rsync-key
Generating public/private rsa key pair.
Enter passphrase (empty for no passphrase):
Enter same passphrase again:
Your identification has been saved in rsync-key.
Your public key has been saved in rsync-key.pub.
The key fingerprint is:
SHA256:LAE4LCnWHq6ihXcTzoBkxhj2HY1pQ0VJwAdO5pjRctA root@server
The key's randomart image is:
+---[RSA 2048]----+
|+.o+o*OX+. |
|oB+++@E.+ |
|=oo+=+=o |
|. .o. o |
| ..+ .. S |
|o.o = . A |
|oo . . = |
|. o |
| |
+----[SHA256]-----+
root@server:~# ll
total 24
drwx------ 2 root root 4096 Jul 19 18:19 .
drwxr-xr-x 21 root root 4096 Jul 17 06:50 ..
-rw-r--r-- 1 root root 1113 Aug 28 2019 .profile
-rw------- 1 root root 1766 Jul 19 18:19 rsync-key
-rw-r--r-- 1 root root 393 Jul 19 18:19 rsync-key.pub
The command ssh-keygen -t rsa -b 2048 -f rsync-key creates a public/provate keypair which can be used for authentication. It has to live in root's home directory!
Hint: Do not use a password, because otherwise you will still have to enter a password during the authentication. (Not exactly for the authentication, but for the decryption of the public key - however: We don't want this !)
The next step is to transfer the public key to the PC. In order to do this, just copy the contents (the line starting with ssh-rsa) of the public key into the clipboard.
ssh-rsa AAAAB3NzaC1yc2EAAAADAQABAAABAQCsdgGYxgSnLBIyS+DJAAGPXynjSS7rx6dju2gXlEu6BqI8Bbr8TBC7w0TLR5iztO3ZvPfJpPqMEts6h2qkBjlXCodN82tPZgLiaV0wp2Ka1Idsd5kc7vJlNGHd4RK4YSt6XsXqu/xZ0I/ALYv017ArJudWgPyyyC8z3IVuLgEmHxrGHLP2etTZz0XfEhbqXDvUPQmabEiT4WAjxDpxXQcESMr84+hPz8XRVgTkq9qOgrH9F36Je2eMd6dE6B9DN2SmNCqNkl2gNfrhC7VU2vVaUHrDIGFN/E4fwE6jqd9ARRvGHHyZZemGbDghxOQIigQO/feZfQnMLxIRzKBtdSgX root@server
Step 4@PC: Allow the NAS to login
This one is simple: Just add the content of the rsync-key.pub (which should be in your clipboard) into the file ~/.ssh/authorized_keys.
The simplest way is to use the editor of your choice (vim, nano, whatever)
Step 5@NAS: Test if you can login w/o password
After that you should be able to establish an SSH connection from the synology into the PC without the need to enter a password. Try it out at the synology with the following command:
Welcome to Linux Mint 18 Sarah (GNU/Linux 4.4.0-21-generic x86_64)
* Documentation: https://www.linuxmint.com
Last login: Sun Jul 19 18:34:24 2020 from 192.168.178.45
myuser@mypc ~ $ exit
Well - if everything works fine, then you should see the prompt of your PC. You can try to run the backup from command line:
receiving incremental file list
./
.bash_history
.lesshst
.viminfo
.adobe/
.adobe/Flash_Player/
.adobe/Flash_Player/AssetCache/
.adobe/Flash_Player/AssetCache/44KV5BXP/
.cache/
.cache/.fr-K6PnKH/
.cache/.fr-K6PnKH/LHD32D50TS20_E001_A151341.zip
.cache/Eclipse/
.cache/Eclipse/WebKitCache/
.cache/Eclipse/WebKitCache/Version 12/
.
.
.
The command does the following:
- Start rsync an tell it to
- -a use the archive mode; (equals -rlptgoD (no -H,-A,-X)) and
- -u skip files that are newer on the receiver and to
- -z compress file data during the transfer with
- -v increased verbosity and to
- --delete delete extraneous files from dest dirs by using
- -e and the remote shell to use is the one we created eralier: /usr/bin/ssh -i /root/rsync-key
rsync afterwards mirrors all files from the directory and subdirectories /home/myuser/ of the PC mybox with the user myuser to the local directory /volume1/backup_mypc/myuser (which is the backup destination that we have created in step 1)
Step 6@NAS: Create a cron job
Since we do not want to do this my hand, we can create a planned task on the synology:
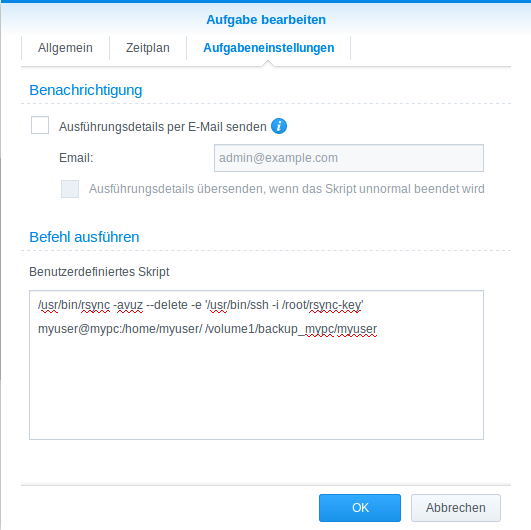
Since rsync does only copy the changes, it is no problem to let it run hourly. Iy you want some kind of time-machine backup then try this script:
#-- begin of user configuration
MACHINE=192.168.178.5
USER=myuser
SOURCEDIR=$USER@$MACHINE:/home/$USER/
TARGETDIR=/volume1/backup_mypc
#-- end of user configuration
TIMESTAMP=`date "+%Y-%m-%dT%H-%M-%S"`
# Create new backup using rsync and output to log
/usr/bin/rsync -avzPh --delete -e '/usr/bin/ssh -i /root/rsync-key' --link-dest=$TARGETDIR/current $SOURCEDIR $TARGETDIR/$USER-$TIMESTAMP > $TARGETDIR/log/$TIMESTAMP.log 2>&1
# check exit status to see if backup failed
if [ "$?" = 0 ]; then
# Remove link to current backup
rm -f $TARGETDIR/current
# Create link to the newest backup
ln -s $TARGETDIR/$USER-$TIMESTAMP $TARGETDIR/current
else
# Rename directory if failed
mv $TARGETDIR/$USER-$TIMESTAMP $TARGETDIR/failed-$USER-$TIMESTAMP
fi
Thats it!