The Problem
I ordered for a parking sensor project some TTGO v2 Boards. Since I am a big fan of the LuaRTOS project i had to port it to this Hardware architecture.
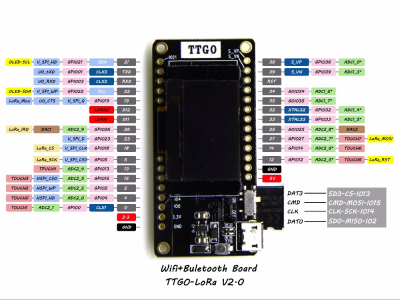
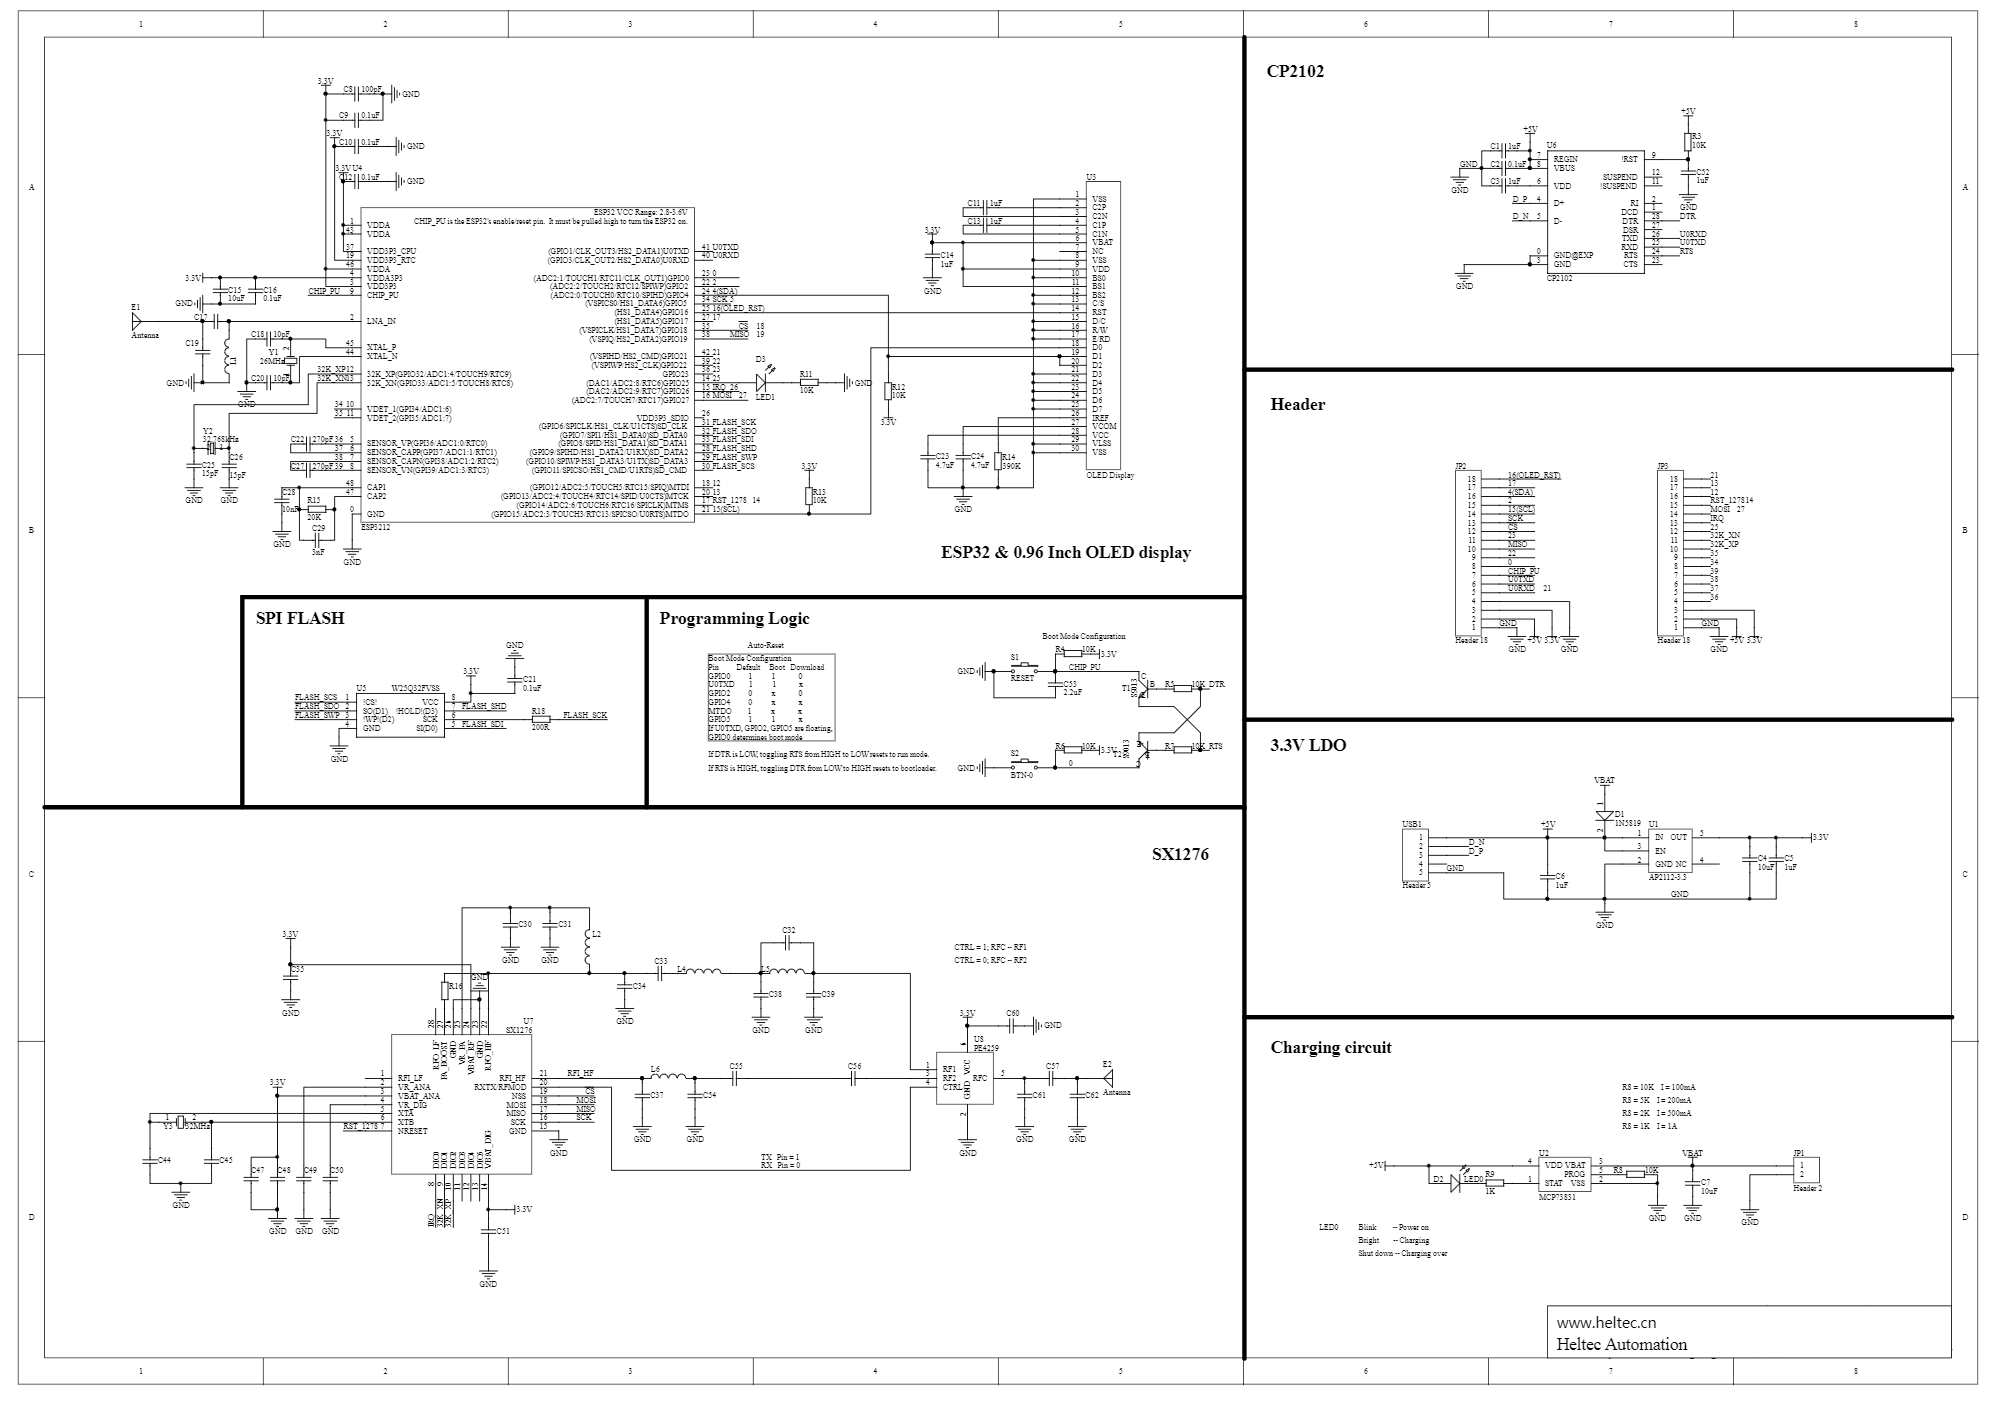
The schematic:
For all of you who do not want to build your own firmware: Here is a with all the features from below. Just extract it to a folder and flash it with the esptool.py
The Solution
With the given information from above, and some spare time I started to play with the components which are mounted on the board.
Graphics Display
The display is a 128x64px OLED which is connected via I2C to the ESP32.
Component config > Lua RTOS > Hardware > I2C pin map: (22) I2C0 SCL
Component config > Lua RTOS > Hardware > I2C pin map: (21) I2C0 SDA
The lua sample code looks like this:
-- LET THE DISPLAY INITIALIZE ITSELF --
gdisplay.clear()
--gdisplay.setfont(gdisplay.FONT_COMIC24)
gdisplay.setfont(gdisplay.FONT_UBUNTU16)
gdisplay.write({gdisplay.CENTER,gdisplay.CENTER},"{b}")
-- Get the screen size
dw, dh = gdisplay.getscreensize()
-- Draw a diagonal line, from the first screen's point to
-- the last screen's point
gdisplay.line({0,0}, {dw - 1, dh - 1})
gdisplay.putpixel(2,2)
gdisplay.putpixel(2,3)
gdisplay.putpixel(2,4)
SD Card Adapter
The SD Card adapter works fine. I wanted to use it with the FAT filesystem - so I choose the following settings:
Component config > Lua RTOS > File Systems: SD Card storage (FAT)
Component config > Lua RTOS > Hardware > SD Card: Interface (SPI interface)
Component config > Lua RTOS > Hardware > SD Card: (3) SDCARD SPI port
Component config > Lua RTOS > Hardware > SD Card: (13) SDCARD SPI CS GPIO number
Component config > Lua RTOS > Hardware > SPI pin map: (13) SPI3 default CS
Component config > Lua RTOS > Hardware > SPI pin map: (2) SPI3 MISO
Component config > Lua RTOS > Hardware > SPI pin map: (15) SPI3 MOSI
Component config > Lua RTOS > Hardware > SPI pin map: (14) SPI3 CLK
The lua sample code looks like this:
cd sd
ls
fs.unmount("sd")
LORA Modem
To get the LORA modem up and running set the following configurations:
Component config > Lua RTOS > Hardware > LoRa Wan: LoRa hardware type (sx1276, used in nodes and single-channel gateways)
Component config > Lua RTOS > Hardware > LoRa Wan: ISM band (Europe - 868 Mhz)
Component config > Lua RTOS > Hardware > LoRa Wan: (2) LoRa SPI port
Component config > Lua RTOS > Hardware > LoRa Wan: (18) LoRa SPI CS GPIO number
Component config > Lua RTOS > Hardware > LoRa Wan: (14) LoRa RST GPIO number
Component config > Lua RTOS > Hardware > LoRa Wan: (26) LoRa DIO0 GPIO number
Component config > Lua RTOS > Hardware > LoRa Wan: (33) LoRa DIO1 GPIO number
Component config > Lua RTOS > Hardware > LoRa Wan: (32) LoRa DIO2 GPIO number
Component config > Lua RTOS > Hardware > SPI pin map: (18) SPI2 default CS
Component config > Lua RTOS > Hardware > SPI pin map: (19) SPI2 MISO
Component config > Lua RTOS > Hardware > SPI pin map: (27) SPI2 MOSI
Component config > Lua RTOS > Hardware > SPI pin map: (5) SPI2 CLK
And the following code allows the device to communicate with the The Things Network
lora.attach(lora.BAND868)
lora.setDevEui("001017CFXXXXXXXX")
lora.setAppEui("70B3D57EXXXXXXXX")
lora.setAppKey("7E6F50891D61AD08CDDDACC7XXXXXXXX")
lora.join()
lora.tx(true,1,"AABBCC")
All components can be used together. That was all I needed.
Happy hacking !