The Problem
Recently i purchased an Amazon FireTv Stick - which is a great device for video streaming. But I wanted more than this stick offers out-of-the-box: I wanted to be able to stream DVB-T and DVB-S (digital terrestrial and digital satellite) signals through my IP network. Somewhere in the internet I stumbled across a few articles which components are needed for this purpose, but in the end I had no idea if and how it would work. I wanted the setup to look like this:
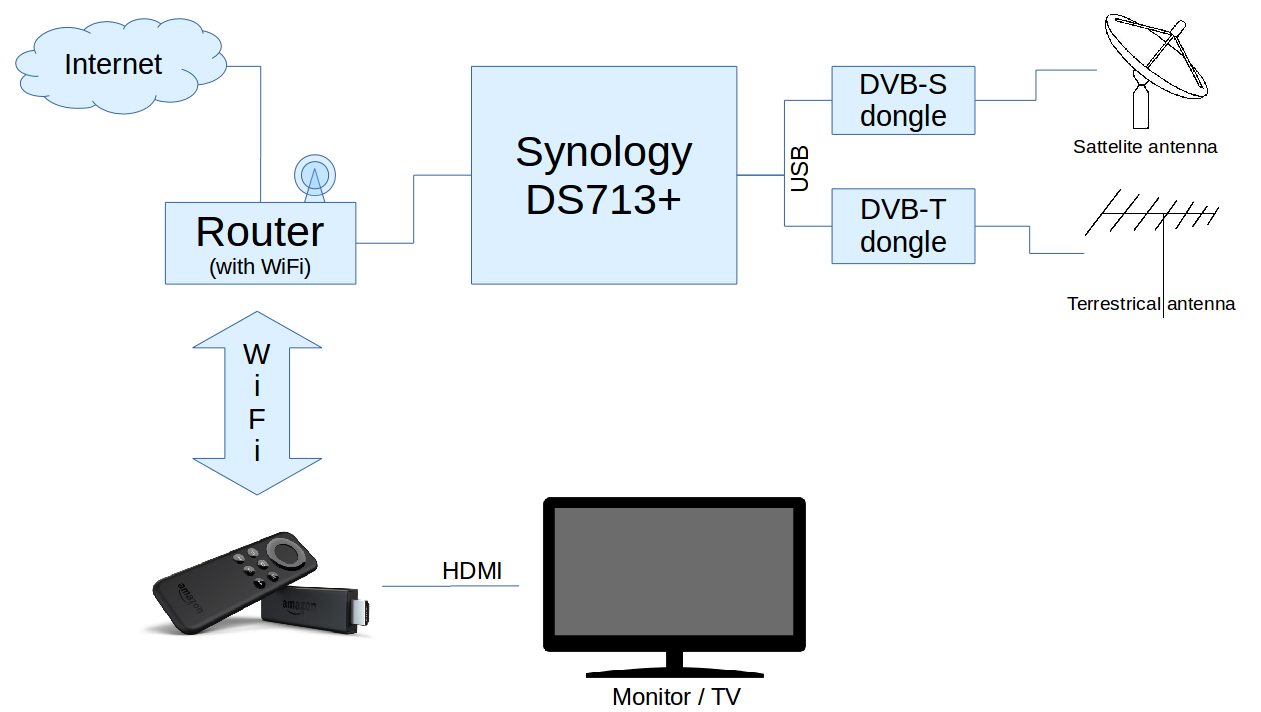
This article describes my journey towards an IPTV enabled home.
The Solution
The solution consists of a set of hardware and software. I assume that most parts of this article can be applied to different configurations as well, but I will focus on my equipment. The order of the section is also the order how I deployed my hardware and software.
Step 1: Buy / Choose hardware
Hardware and software are always somehow tied together. This means that the chosen hardware limits the available software and vice versa. Since hardware is expensive, and open-source software is freely available I decided to go with my Synology DS713+. Under the hood it is an Intel Atom D2700, a bit or RAM and a bunch of disks which is powered by a Linux operating system called Disk Station Manager. This operating system is documented very well (the german synology wiki is a great source of information) and provides a lot of cool features like which can be configured with two or three mouse clicks in the web based graphical user interface.

Beside this beautiful GUI you can log in via SSH. This has to be enabled beforehand in the Controlpanel -> Terminal&SNMP -> Enable SSH service.
I hear you asking: How does this influence the hardware ? ... Well: Synology supports out of the box a lot of DVB sticks. In the end I chose the following two models which where easily available at amazon:
- DVB-T: Hauppauge WINTV NOVA-T-STICK
- DVB-S: PCTV 461e DVB-S2 Stick or Technotrend S2 3650 CI
Both of them are connected to the USB3.0 ports at the NAS and the corresponding antennas on the other side. This is all for the IPTV server. As client hardware I chose my Amazon FireTV stick, but the described set up should also work with a Raspberry Pi.
Step 2: Set up an IPTV server
The DSM software comes with a promising feature: "Video Station". Unfortunately several sources in the internet suggest that this video station package is used to record DVB* streams to the disk, to stream video files from the disk to the clients in the network and it is not able to stream live TV across the network. Another package called DVBLink promises to do exactly what we want: To stream DVB* signals across the network. If you dig deeper then you will find out that the base installation of DVBLink is free, but the needed DVBLink TVsource module for receiving the signals via the USB adapters will cost you additional money - this is not what we want.
The way out of this seems to be TvHeadend which is a TV streaming server and recorder for Linux, FreeBSD and Android supporting DVB-S, DVB-S2, DVB-C, DVB-T, ATSC, IPTV, SAT>IP and HDHomeRun as input sources. Tvheadend offers the HTTP (VLC, MPlayer), HTSP (Kodi, Movian) and SAT>IP streaming.
Step 2.1: Install Tvheadend
Tvheadend is not available within the standard repositories of the package manager, so the first step is to enable the community repositories in the package manager:
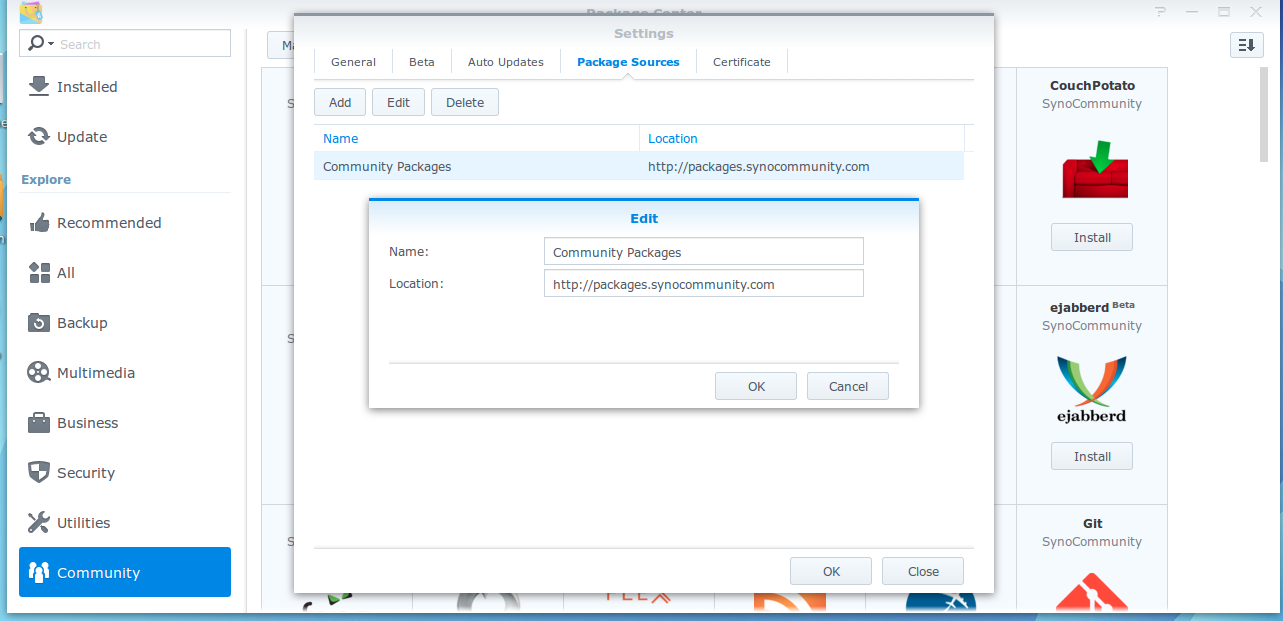
After a reboot of the NAS you should be able to install a package called "Tvheadend". You are able to install it if you trust "Synology Inc. and trusted publishers". Tvheadend enables the user to stream DVB* data across the network. But ... where does TvHeadend get the data from ? ... The short answer is: It takes whatever the operating system provides. It does not come with its own set of drivers.
Step 2.2: Load the hardware drivers
If you crawl the internet then you will find different answers to the questions "Where do we get the hardware drivers from ?". Here is a list of the most popular ones:
- Find out which one you need, download the source of them, compile it against your kernel and load the modules. -> Nope, too much effort. I want it to be simple.
- Download this "xxx" it works for me -> Nope, most likely the wrong version and / or no longer maintained.
- Use the ones that VideoStation provides -> Well - Thats a point !
I personally went with the third one because VideoStation is a package which is available in the package manager of DSM and therefore the drivers should be are maintained by Synology. and so i installed the "Videostation" package from the package manager. It took me a while till I found out that the start sequence of the both packages is crucial for the success.
- Ensure that Videostation and Tvheadend are stopped
- Start VideoStation
- Start TvHeadend
If this doesn't work then try to stop both services, reboot (or even better: powercycle) the device and try again. However in the end you should be able to log into the tvheadend server.
Step 2.3: Configure Tvheadend
Tvheadend is dead simple to configure. One you logged into it (http://<ip.of.nas>:9981/extjs.html) you can navigate with the tabsheets on the top into different sections. I don't want to go into details, I just want to give you a small overview how things are configured in my set up:
- Configuration -> Access control: Add a new user "firetv" which is not an admin user.
- Configuration -> DVB inputs -> TV Adapters: Your adapters should be selectable in the combobox below. Configure them and don't forget to enable them.
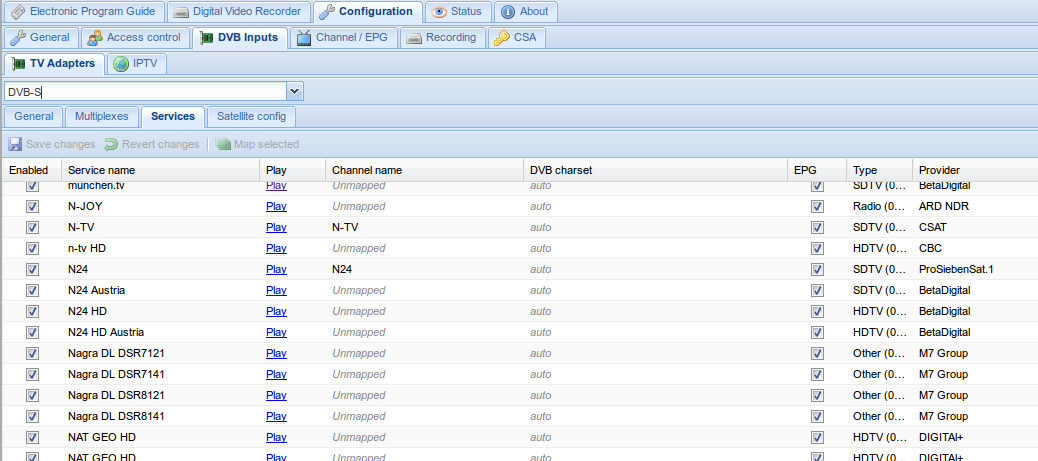
- In the tabsheet Configuration -> DVB inputs -> TV Adapters -> Services you can find the available TV channels. If this list is empty then wait for a while, the first scan takes a few minutes. Select the ones you want to have and click "Map selected". This makes them to TV channels
From this point on you should be able to watch live TV for all mapped channels.
Play a little bit around with it - it is really easy.
Step 3: Set up an IPTV client
In the first try the client software can be a VLC player. It is simple to set up and configure on a standard PC and runs under every major operating system. I used it in the beginning to verify that the TvServer is running (by pressing the play link in the upper screenshot). In my case I was looking for a software which would run on my Amazon FireTv stick. I tried the VLC application from the appstore - but this lead to no success. Google suggested that Kodi is able of doing this. Kodi is a simple to use open source home theatre software, but unfortunately it is not available through the app-store. To install it you have to sideload it onto your stick.
Sideloading means to install software onto the stick, which is not available in the appstore. Since the stick has neither a SD-card reader nor a USB port you have to do some tricks. The trick is to upload an APK package to the Android operating system and to install it from there. This can be done in various ways. Here are a few suggestions:
- Enable the debug mode on the stick and do 'inject' the software to the stick - Like described in this article or in this article.
- Install EzExplorer (a kind of file explorer for android) to the stick, download the *.apk with the rzExplorer and install the file.
This video shows the second approach.
After this step you have a fully functional installation of Kodi isengard (compiled for Android) on your FTV stick. Afterwards you have to enable the TvHeadend Provider in Kodi and the TV part and then you are finished. The kodi wiki provides a step by step solution how to connect kodi to Tvheadend.
Step 4: Optimize your system
If you have come to this point then you already have a working system - but it might have some issues. Here is a list of common problems and their solution:
HD channels are stuttering
Identified problem: The buffer for the data transfer is too small. High bitrate HD movies need more bandwidth.
Solution: Found here - Create a file named advancedsettings.xml (attatched below) and put it (vis ssh or sideloading) into the directory Android/data/org.xbmc.kodi/files/.kodi/userdata/
Format is not correct (16:9, 4:3, ..)
Identified problem: Wrong settings
Solution: Found here - Go to “System” -> “Settings” -> “Video” -> “Acceleration” and set “Decoding method” to “Software“.
I don't want to load VideoStation because i don't need it. I just want the drivers for Tvheadend
Identified problem: No Problem - Configuration issue.
Solution: Idea found here, but this is the . Log into the NAS and modify the startup script of tvheadend /var/packages/tvheadend/scripts/start-stop-status as follows.
Add three variables:
WAIT_FOR_ADAPTERS="0 1"
TVH_DELAY=15
The variable DVB_KERNELSCRIPT contains the path to the program which loads the DVB drivers in the VideoStation. The WAIT_FOR_ADAPTERS will wait till adapter 0 and 1 will become ready. If they are not ready within TVH_DELAY seconds they will be skipped. To wait for three adapters the variable WAIT_FOR_ADAPTERS would have to contain the string "0 1 2".
Finally the start daemon code must be changed to the following:
{
echo "Looking if drivers in /dev/dvb/* are already laoded"
if [ ! -d /dev/dvb ]
then
# Run the script from VideoStation to insert the kernel modules
echo "/dev/dvb does not exist (yet) ... starting the driver script"
[ -e "${DVB_KERNELSCRIPT}" ] && "${DVB_KERNELSCRIPT}" "start"
# Wait for the adapters to get ready
for t in $WAIT_FOR_ADAPTERS
do
WAITED=0
while [ ! -c "/dev/dvb/adapter${t}/frontend0" ] && [ $WAITED -le $TVH_DELAY ]; do
sleep 1s && echo "`date`: TVHeadend Init; tuner device ${t} is not ready. Waiting 1 second..." "$NAME"
WAITED=$((WAITED + 1))
done
[ ! -c "/dev/dvb/adapter${t}/frontend0" ] && echo "`date`: TVHeadend Init; tuner device ${t} not ready after delay. Continue
done
fi
echo Starting ${DNAME} ...
${TVHEADEND} -f -u ${USER} -c ${INSTALL_DIR}/var -p ${PID_FILE}
}
This code looks into the device tree if the directory /dev/dvb/* is present. This is the place where the dvb drivers are placing the device nodes for the adapters. If the drivers are not loaded then this directory usually does not exist. If it doesn't exist then it starts the script to load the drivers which is provided by VideoStation. Starting the script does not mean that the devices are ready - so the script waits till in every device node the directory frontend0 is available - which is a sign that the device is ready. It it doesn't come up within TVH_DELAY seconds then the device is skipped.
Unsolved issues
I have spent multiple afternoons to get these issues fixed, but i did not find a solution for them (yet). If you have an idea how to get around these bugs - let me know in the comments section.
- TvHeadend is sometimes not able to recognize (some of) the DVB hardware - even if it is present within the filesystem at the start time of TVH. After a reboot of the process everything works fine.
- Sometimes the DVB drivers seem to crash (no idea when and why) - only a power off / power on cycle of the adapters helps. -> This seems to be an issue with USB3. Since I plugged both adapters via a USB hub into the frontside USB2 connector eveything is working fine and there where no crashes any more.
- SD channels judder a bit
- Kodi V16 is not compatible with the TvHeadend from Synology (HTSP Protcol version issue). It works with Kodi Isengard 15.1.1.
Have fun !