The Problem
Social interaction is getting more and more a part of our daily business. If you write a good article in your blog then you (most probably) want it to be shared and read by other people. A lot of blogging systems offer this as a built in feature, but with XWiki this is unfortunately not the case. This article describes how to embed social share buttons into panels which can be placed within your XWiki application and how to optimize your meta information for these buttons to get the most out of them.
The Solution
The herein presented solution is definitely not the only way how to do this, but it describes how I did it. If you are a professional web designer then you may already know all the details and you can for sure skip the rest of this article, but if you don't know where to start and how to go on then keep on reading and save a lot of precious time. I assume that you already know what facebook and twitter is, and that you already have accounts for these platforms.
Objects: The Buildingblocks of XWiki
I think the most important thing is to know that XWiki is more than just a plain Wiki. XWiki is a platform for developing collaborative web applications using the wiki paradigm. Under the hood we can say that wiki pages, blog articles, templates and actually everything else is stored as object which lives in a certain space. While spaces are just containers for objects, the objects themselves can be altered in various different ways. For example: if you edit your blog article then you are actually modifying certain attribute of an (BlogArticle-)object within the wiki via a nice GUI editor. The objects can also be altered via a scripting language inside the platform which is called velocity. Velocity is a vital part of the rendering engine inside the wiki which allows the user to tell the platform how certain objects should be rendered.
Since the instances of XWiki installations meight be different (and also the URLs which are displayed inthe browsers adressbar) we should agree on a common notation of Pages within XWiki. <Space>.<Pagename> For example the referenced Page Xwiki.Panels is a Page called Panels which lives in the Space XWiki. So lets get our hands dirty and start modifying your installation.
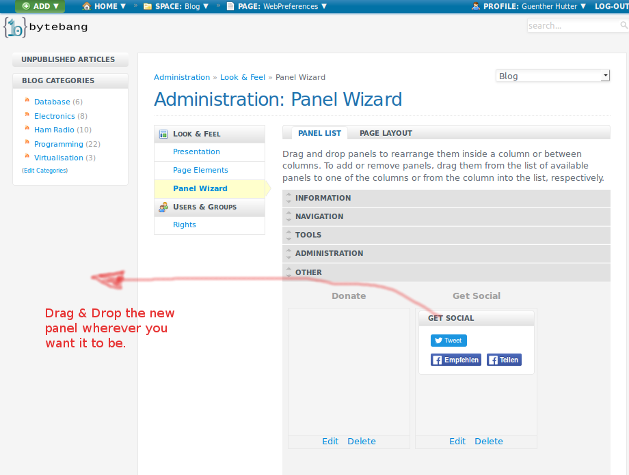
Step 1: Build a Panel
Panels are - you may have already guessed it - nothing else than special obejcts within XWiki. They are stored in the location Xwiki.Panels. Every panel is stored as one entry, and all panels can be placed in the Wiki via the Administration console (Administster Space -> Look & Feel -> Panel Wizard).
So lets get started:
- Log into the XWiki as administrator
- Create a new panel by navigating to the Xwiki.Panels page, enter a new panel name (something like 'Get social') into the text field and click CREATE. This should lead you to the edit page of your new panel. The panel name is later on used as header of the panel.
- As panel view type choose 'view'.
- Choose a category. The category determines where the panel should appear within the panel wizard.
- Enter a short description. This shows up within the Panel wizard.
- Enter the content.
Well - now the question is: What can we enter into the content box ? -> The answer is simple: velocity code. Lets look at my code:
#panelheader('Get Social')
{{html}}
<!-- facebook -->
<div id="fb-root"></div>
<script>(function(d, s, id) {
var js, fjs = d.getElementsByTagName(s)[0];
if (d.getElementById(id)) return;
js = d.createElement(s); js.id = id;
js.src = "//connect.facebook.net/de_DE/sdk.js#xfbml=1&version=v2.5";
fjs.parentNode.insertBefore(js, fjs);
}(document, 'script', 'facebook-jssdk'));</script>
<table style="border:none;">
<tr>
<td colspan="2" style="border:none;"><a href="https://twitter.com/share" class="twitter-share-button"{count} data-url="$doc.getExternalURL()" data-text="$escapetool.xml($doc.plainTitle)" data-via="oe6gue" data-dnt="true">Tweet</a>
<script>!function(d,s,id){var js,fjs=d.getElementsByTagName(s)[0],p=/^http:/.test(d.location)?'http':'https';if(!d.getElementById(id)){js=d.createElement(s);js.id=id;js.src=p+'://platform.twitter.com/widgets.js';fjs.parentNode.insertBefore(js,fjs);}}(document, 'script', 'twitter-wjs');</script></td>
</tr>
<tr>
<td style="border:none;"><div class="fb-like" data-href="$doc.getExternalURL()" data-layout="button" data-action="recommend" data-show-faces="true"></div></td>
<td style="border:none;"><div class="fb-share-button" data-href="$doc.getExternalURL()" data-layout="button"></div></td>
</tr>
</table>
{{/html}}
#panelfooter()
{{/velocity}}
The code is splitted up into three logical parts:
- The intro. The rendering engine is told that everything within this box is velocity code. Afterwards the title of the panel is set. and at last the mode is switched to HTML code.
- The HTML Code that (a) loads a javascript for the Facebook button, (b) the table where the Facebook and the twitter button lives.
- Finally the html mode is switched off, the panel is closed and the velocity block is closed
The Code in the HTML section is not only HTML. Lets look at the following line: <div class="fb-like" data-href="$doc.getExternalURL()" data-layout="button" ... the expression $doc.getExternalURL() is interpreted by the velocity engine and translates finally to the URL of the current page. There are a lot of other functions and variables that you can use described in the XWiki scripting API reference. Of course the content of a panel is not limited to the like or sharebuttons on facebook, or the twitter buttons - you can always add static HTML into this block. However. If you managed to do everything right you should end up with a new panel that can be embedded in the current page layout.
Step 2: Optimize your meta information
If someone likes to share your page then a click on the Facebook button should give you already a possibility to share your page, but I am pretty sure that you will not be satisfied with the result. The reason why your first share might look a little strange is that Facebook (and also other web scrapers) do not know what is important to you and what images it should use. This information is usually stored in the header of the delivered web page as meta information. To be more precise: It is stored in the OpenGraph information which is (or lets say should be) contained in the header section of your homepage.
So lets get our blog content annotated correctly. Since the OpenGraph information is stored in the header of the webpage we can edit it in the Administration -> Look & Feel -> PageElements Section of the wiki administration. There is a text box called 'HTTP META INFO' which can be filled with velocity-styled content to be rendered onto every page. Lets have a look at my example:
<meta property="og:type" content="article" />
#foreach( $tag in $tdoc.getTagList() )
<meta property="og:article:tag" content="$tag" />
#end
<meta property="og:article:published_time" content="$tdoc.getCreationDate()" />
<meta property="og:article:modified_time" content="$tdoc.getContentUpdateDate()" />
<meta property="og:url" content="$tdoc.getExternalURL()" />
## Bilder ausgeben. Wenn am Artikel welche dran sind dann die verwenden, Sonst nur das Logo.
#set($nimages=0)
#foreach( $attmnt in $tdoc.getAttachmentList() )
#if( $attmnt.isImage() )
#set($nimages=$nimages+1)
<meta property="og:image" content="$context.URLFactory.getServerURL($context.context)$tdoc.getAttachmentURL($attmnt.getFilename())" />
#end
#end
#if( $nimages == 0 )
<meta property="og:image" content="http://www.bytebang.at/download/XWiki/DefaultSkin/bb_logo.png" />
#end
The code is pretty self explanatory. Meta properties are created along the opengrpah specification and the values are filled with content / information of the current wiki page. There are a few nice features within this code:
- The blog article summary is taken as description for the page.
- The tags of the article are rendered into the keywords. Additionally there is always the keyword 'bytebang' attatched ( - just as a simple search engine optimization)
- If the blog article has at least one image attached, then this image is used in the Open Grpah info. Otherwise a hard coded logo (bb_logo.png) will be used.
So once you have optimized you header information for the blog space the share dialogue for Facebook will look like this:
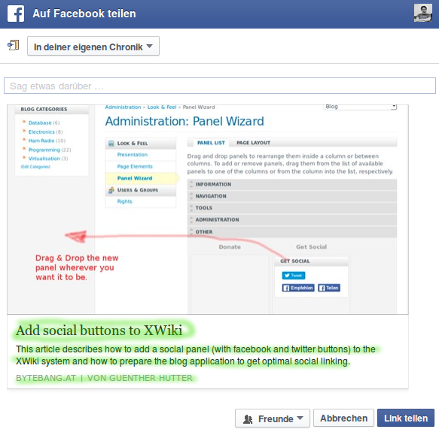
The green highlighted information is fetched directly from the article. If you want to play around with the script then I suggest using Facebooks object debugger - also called linter. You can feed the webapplication an URL and preview how it would look like if you share the link in Facebook. Additionally it provides information about found and missing metainformation, images and so on. Since I am not a professional web developer I am pretty sure that there are other (propably more effective) ways how to get these kind of things done, but this is all what I wanted to achive.