The Problem
Kepware has a wonderful program named KEPServerEx. For those of you who dont know what this is: The KEPServerEx can be seen as a kind of modular data aggregation server which is able to collect data from various machines / devices, and which is able to process / analyse / store it afterwards. This approach takes a huge burden from every company who wants to connect to PLCs CNC machines and so on, because the drivers which can be purchased at their site are able to understand these devices and bring the information into a standardized format like DDE, OPC or OPC/UA.
Within one of their latest releases they introduced a new IoT Gateway module which is able to publish the collected data tags via MQTT brokers - which renders it as perfect companion for the simpledashboard.io visualization. The following few paragraphs will show you how to set up such a scenario - and in the end we will see that this approach is good - but not ideal for every situation.
Configuration of the IoT Gateway
The first step is to download and setup the KEPServerEx. This is pretty straight forward: Go to their page, request a demo license, download the software, install it and you are done.
The configuration of the IoT Gateway can be done in the configuration interface.
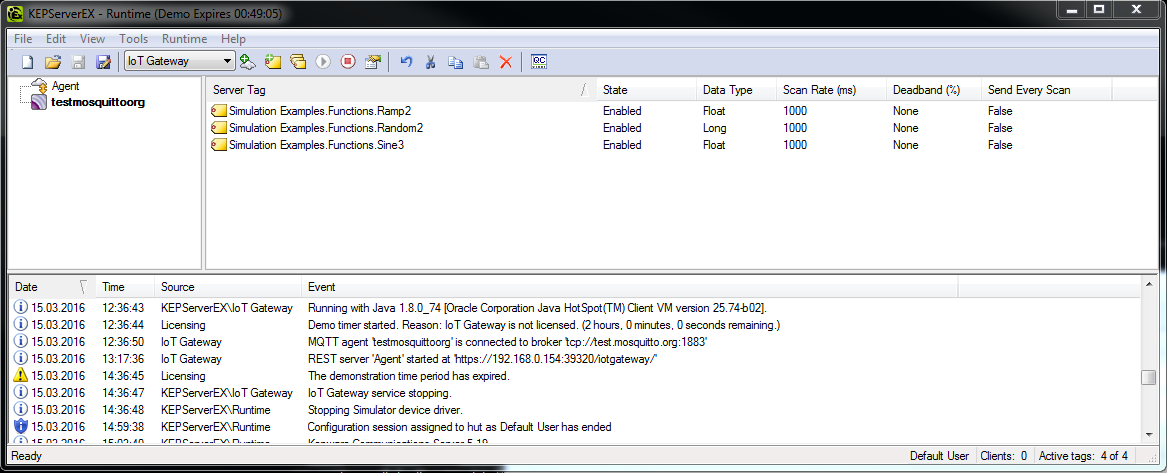
Here we see that i have three tags (from the simulation extension) that are producing data which should be published via the IoT Gateway.
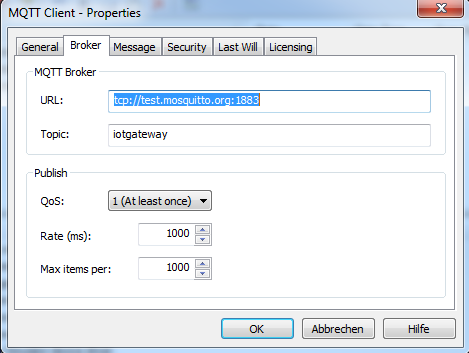
You have to configure where the data should be published to. I decided to use the public mosquitto test broker for the first tests.
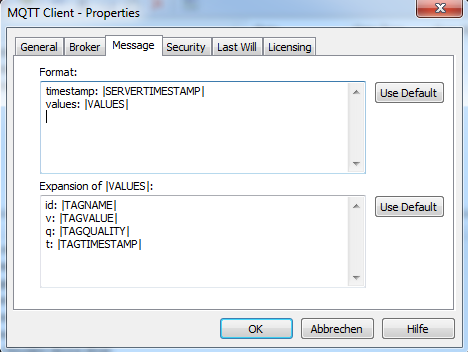
You can also decide how the message format should look like. The upper block decides which information should be sent per publish cycle and the lower block which information per (changed) value.
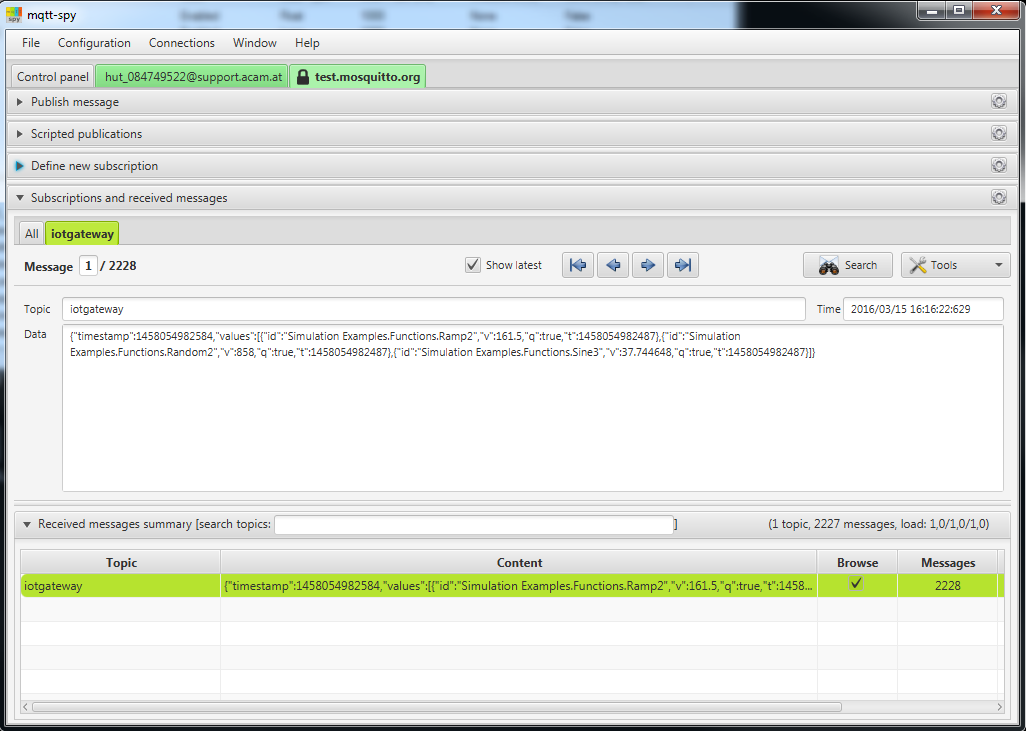
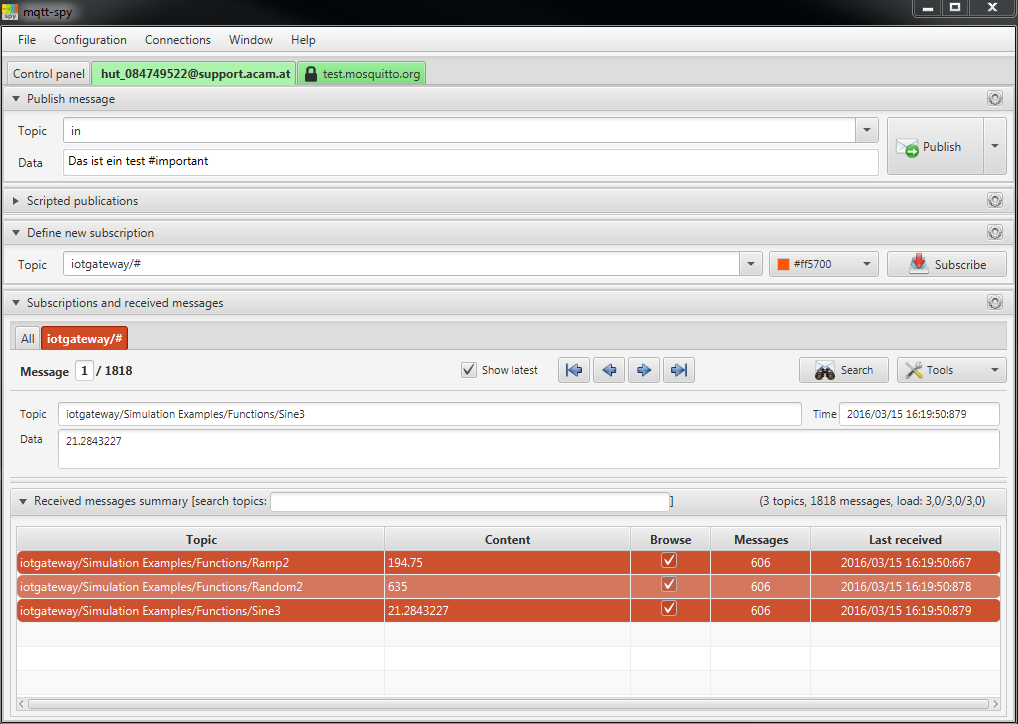
The excellent free tool mqtt-spy shows that the KEPServerEx is working correctly. It sends cyclic messages to the defined broker. Lets have a more detailed look into the message format:
"timestamp": 1458052741542,
"values": [{
"id": "Simulation Examples.Functions.Ramp2",
"v": 157,
"q": true,
"t": 1458052741529
}, {
"id": "Simulation Examples.Functions.Random2",
"v": 248,
"q": true,
"t": 1458052741529
}, {
"id": "Simulation Examples.Functions.Sine3",
"v": 38.4257393,
"q": true,
"t": 1458052741529
}]
}
Here we see the content of one MQTT message sent by the Kepware IoT Gateway. One can see that there is a message header and an array of objects which represent the changes. For every change the following variables are filled out:
- id: Name of the tag within the KEPServerEx
- v: Value of the tag
- q: Quality of the tag
- t: Timestamp when the tag value was changed
Even if this is a good idea to represent data as JSON, it violates the idea of MQTT. Why is this a problem ?
- MQTT is designed to be used as publish / subscribe protocol. The usage of a single topic for all data tag changes makes it impossible to decide on a fine granularity if the change is important for an application or not.
- Every application which subscribed the iotgateway topic has to be able to parse the JSON format. While this is not a problem for a full blown computer, some microcontrollers or other devices with limited memory or other constraints are struggling to do this.
The Solution
To resolve this unsatisfying situation I came up with the following idea: Since we are not able to influence the way how KEPServerEx publishes the data tags via MQTT we have to parse the provided information on a central server and republish the parsed data in separate topics. Something like this:
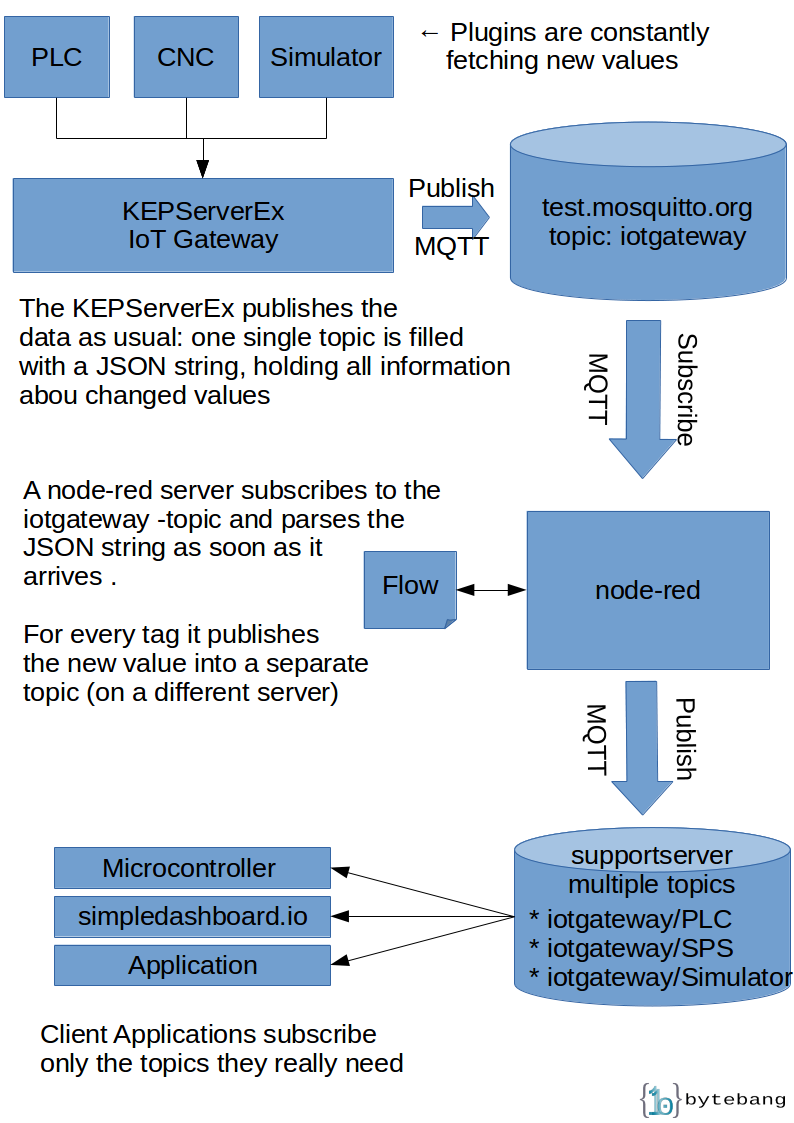
Setup node-red
Node-red is a visual tool for wiring the internet of things. it is based on nodeJS and therefore written in JavaScript. The setup in windows is straight forward - as long as you have installed chocolatey (which can be seen as a kind of apt-get for windows). So lets start by installing node-red:
C:\>choco install npm
C:\>npm install -g --unsafe-perm node-red
C:\>node-red
This elegant four-liner must be run with elevated rights - in other words within a administrator console. The output is omitted for readability purposes. Here is what happens within this script: (1) installs node.js on your machine. Afterwards (2) installs npm (a package manager for installing node-js extensions) on the same machine. (3) tells npm that it should install node-red, and (4) starts node-red. The whole installation took on my Win7 machine about 10 minutes. There are for sure other ways how to get node-red up and running, but this one worked for me.
Setup a flow within node-red
You can access the newly installed node-red instance on your browser on the URL http://localhost:1180. There you can define a so called flow which is nothing else than a fancy word for a workflow which processes data. One could compare this to gnuradio - which follows pretty the same concept. However - we want to have a flow that subscribes to a mqtt broker and which publishes the data to another broker. Here is one that works for me:

Done be confused by the names within the boxes - these are just names. If you doubleclick one of the boxes then you can edit the box specific properties. So what are we doing here
- We fetch the data from test.mosquitto.org (topic: iotgateway)
- Nodejs gets this information as a String - to be able to work with it we have to convert it into a JSON object.
- Here is where the magic happens - we will cover this in a few lines
- The output of the function block is the source for (a) the green debug block, whose only purpose it is to show the messages within the webinterface and (b) into a mqtt sink which points to another mqtt server. On the sink there is NO topic defined - because we are assigning the topics dynamically within the function block.
OK - what exactly is happening within the function block?The function block takes arbitrary inputs and processes it via a small user provided JavaScript snipplet. In my case it looks like this:
{
var newmessage = msg.payload.values[i].v;
var newtopic = msg.topic + '/' + msg.payload.values[i].id;
newtopic = newtopic.replace(/\./g,'/');
node.send({ payload:newmessage, topic:newtopic });
}
The snipplet looks straight forward - but in opposite to the examples provided on the online help for writing functions we are having no return value. Instead we are reading out the id ans the value from the KEPServerEx JSON and for each of them we are calling the function node.send() which triggers the delivery of the message content to a specific topic within the target MQTT server. This is easier to understand if you look at the final result:
We can see that the id imulation Examples.Functions.Ramp2 is converted to the topic Simulation Examples/Functions/Ramp2. The value is the value which corresponds to this tag. The big advantage of this approach is that it follows the MQTT way:
- Applications can subscribe to these parts of the notifications (topics) where they are interested in
- Applications have no longer to parse the whole JSON which is provided by the KEPServerEx IoT Gateway to find out that the information is not interesting for them - which saves pure battery power on small devices.
- It is possible to define a finer granular way of security in the broker.
- Applications do not have to remember the last values - this is done by the MQTT broker